Wireless MAXg Bridge (USR5432)
Installation
For Bridge mode, you must be using a wireless router or access point that supports
WDS (Wireless Distribution System). If you select Bridge mode, you will be able
to select either WPA PSK (AES), WPA PSK (TKIP), WEP Open, or WEP Shared for
the encryption method. If you select Infrastructure mode, you will be able to
select either WPA2 PSK (AES), WPA2 PSK (TKIP), WPA PSK (AES), WPA PSK (TKIP),
WEP Open, or WEP Shared for the encryption method. If you select Ad hoc, you
will only be able to select either WEP Open or WEP Shared for the encryption
method.
You must have administrator rights on your computer in order to install this
product.
Be sure to find out what letter your CD-ROM drive uses before you begin installing
your new product. You will need to know this to install your software.
Note: For the most updated information, visit: http://www.usr.com/support
You can also refer to the User Guide on the U.S. Robotics Installation CD-ROM
for more detailed information.
Step One: Connect the Wireless MAXg Bridge
Note: Look at the label on the bottom of the Wireless MAXg Bridge and write down the WLAN and the LAN MAC addresses listed before you physically
place the Bridge. You will need these for future reference.
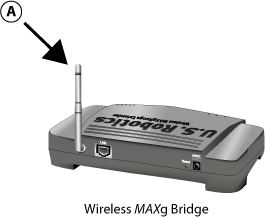
- Connect the antenna to the Wireless MAXg Bridge.
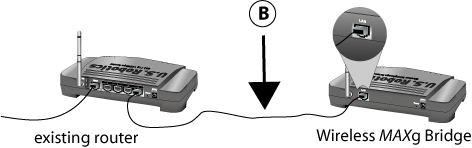
- Connect the supplied Ethernet cable to the LAN port of the Wireless MAXg
Bridge and to a LAN port on a networking device, such as a router.
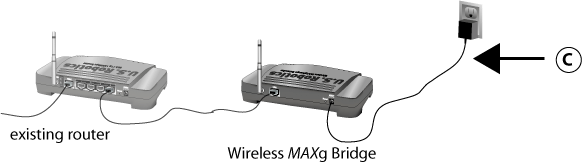
- Connect the power adapter to the Wireless MAXg Bridge and to a standard
wall power outlet.
Note to UK Users: Attach the correct power plug to the power adapter.
Step Two: Locate the Bridge in your network
Note: It is recommended that the Wireless MAXg Bridge
is always configured via an Ethernet connection. This will ensure the configuration
changes are made without modifying the properties of any wireless cards in your
network.
Windows Users
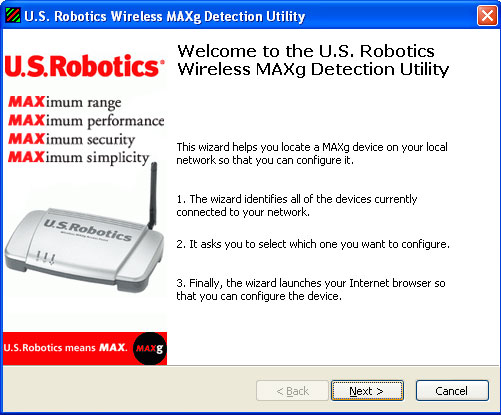
- Insert your U.S. Robotics Installation CD-ROM into the CD-ROM drive of a
computer connected to the existing router. The Installation CD User Interface
will appear on your screen. If prompted, select your preferred language. Follow
the on-screen instructions to install and open the Detection Utility.
Note: If your CD-ROM does not automatically launch, click Windows Start,
Run, type D:\setup (or the appropriate letter of your CD-ROM drive),
and click OK.
- Click Next when the Detection Utility opens.
Note: If you have multiple network adapters connected to the computer
on which you are running the Detection Utility, you will need to select the
adapter that is connected to the wireless network. Click Next.
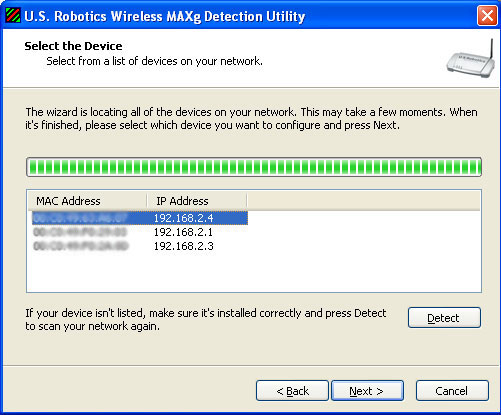
- After the devices on your network are detected, determine which is your
Bridge by matching the LAN MAC addresses. The LAN MAC address of the
Bridge is located on the label on the bottom of the Bridge.
If you do not see the LAN MAC address for your Bridge, make sure it
is connected properly and click Detect to scan your network again.
Select the LAN MAC address for your Bridge and click Next.
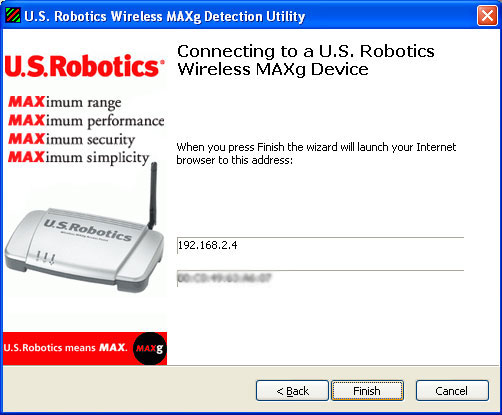
- Click Finish to exit the Detection Utility and to open the Web User
Interface in a new browser window.
Macintosh and Linux Users
- The networking device that the Bridge is connected to probably has
some form of Web User Interface where you can view a client list. Refer to
your networking device's documentation to determine how to view this information.
- When you find the client list, locate the Bridge. You can do this
by verifying the LAN MAC address that is on the bottom label of the Bridge and what appears in the client list. Write down the IP address of
the Bridge for future reference.
- Open a Web browser, type in the IP address of the Bridge, and then
press Enter. This will open the Web User Interface of the Bridge.
If you cannot connect to the Bridge, make sure all the connections
are secure and correct.
Step Three: Configure the Wireless MAXg Bridge
- Click Start to begin the Setup Wizard procedure.

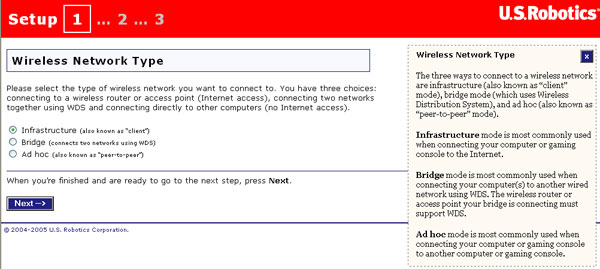
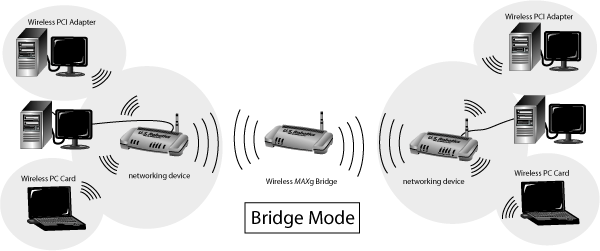
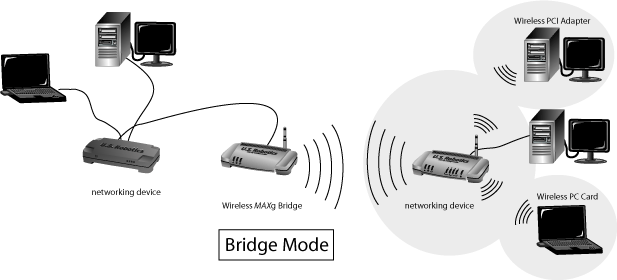
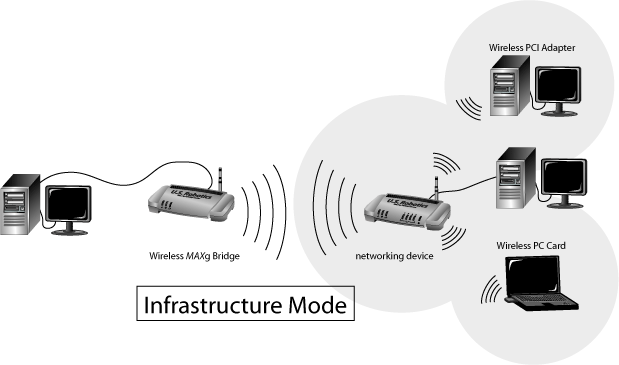
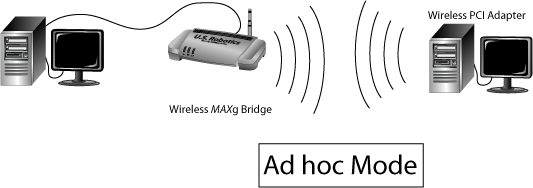
- First you will need to select the Wireless Network Type: Infrastucture,
Bridge, or Ad hoc. If you will be using the Wireless MAXg Bridge
to connect a computer or other networking device to an existing wireless network,
select Infrastucture. If you will be using the Wireless MAXg Bridge
to connect two WDS networks together, select Bridge. If you will be
using the Wireless MAXg Bridge to connect a computer directly to another computer
with wireless capabilities, select Ad hoc. After you have selected
your network type, click Next.
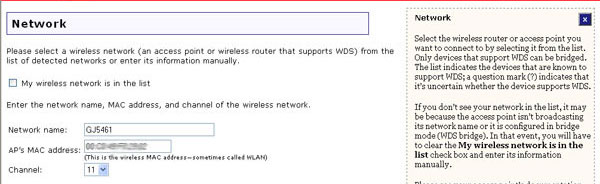
- Next you will need to select the Network Name (SSID) of the wireless network
device to which you will be connecting the Bridge. If you do not see the Network
Name (SSID) of the appropriate wireless network device, click Scan
to search the area again.
Bridge mode Note: When you select a wireless router or access point
to which you want to connect, make sure you choose one that supports WDS.
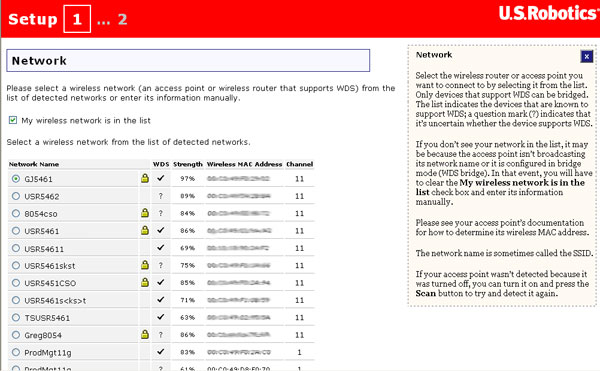
If the appropriate network device does not appear or if that device is not
broadcasting its Network Name (SSID), deselect the My wireless network
is in the list/My wireless network is broadcasting its network name checkbox
and manually enter the information for the network device. You will need to
enter the network name, the wireless MAC address, and the correct channel
of the existing wireless network.
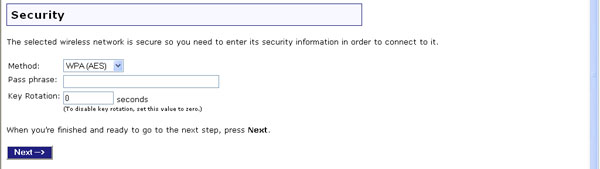
- Next, you will need to select the security Method and the Pass
phrase or the Key (depending on if you selected WPA PSK or WEP).
These settings must match the security information of the wireless network
device to which you are connecting the Bridge. The Bridge only supports WPA2
in Infrastucture mode. When you are finished, click Next.
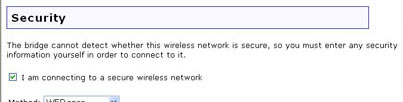
Note: If the Bridge is unable to determine whether or not security
is enabled on the wireless network device to which you will be connecting,
you will need to manually make a choice:
- If you know that security is enabled, make sure the I am connecting to
a secure wireless network checkbox is selected, enter the appropriate
information, and click Next.
- If you know that security is not enabled, deselect the I am connecting
to a secure wireless network checkbox and click Next.
- On this page you will need to create a User name and a Password
for login purposes to the Wireless MAXg Bridge. These fields are case-sensitive.
When you are done, click Finish.
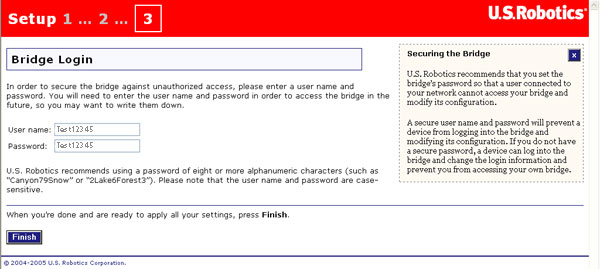
- Click Continue to go to the Web User Interface of the Bridge.
You will be prompted to enter the user name and password you just created
in order to access the Web User Interface of the Bridge.
Note: After you have completed the installation and configuration procedures,
it is recommended that you create a backup file of your settings in case you
ever experience some difficulties and want to restore your settings. Click the
Device tab and then click Back Up in the Back Up Settings section.
Refer to the Device section in the
Web User Interface chapter of this guide for more information about this feature.
Step Four: Reposition the Wireless MAXg Bridge
You can now move the Wireless MAXg Bridge to a different location to
use its wireless capabilities. Disconnect the Ethernet cable and the power adapter
of the Wireless MAXg Bridge. Position the Bridge within the coverage
area of your wireless router or access point and plug in the power adapter.
The Bridge should now establish a wireless connection to your wireless router
or access point.
Congratulations!
You have finished installing your hardware and the necessary software. Your
Wireless MAXg Bridge provides wireless clients with the ability
to connect to a wireless network that was previously too far away to establish
a connection. For troubleshooting and technical support information, refer to
the "Troubleshooting" section
of this guide for more detailed information.
Register your product
Register your product online at http://www.usr.com/productreg